micro:bitからBLE通信で送られたデータをWebブラウザで表示する
今更ながらBLE通信のお勉強のため、眠っていたmicro:bitを引っ張り出してきました。micro:bitとPCをBLE接続し、micro:bitからNotifyで送信されたデータをWebブラウザで取得するところまでできたので、備忘録として残します。
環境
micro:bitをArduino IDEでプログラミングするための準備
以下のページを参考にしました。
Arduino IDEのボードマネージャーで「nRF5 boards」を追加します。この中にmicro:bitが含まれています。今回使うのはV1.5なので、「BBC micro:bit」を選択します。
BLEPeripheralライブラリの追加
BLE通信用に以下のライブラリを使用します。
- 上記リンクからzipファイルをダウンロード。
- Arduino IDEの[スケッチ]-[ライブラリをインクルード]-[ZIP形式のライブラリのインストール]をクリック。
- 1でダウンロードしたZIPファイルを選択。
- [ファイル]-[スケッチ例]で「BLEPeripheral」のサンプルを選択できることを確認。
LED表示用Screenライブラリの追加
BLEPeripheralと同様に下記のライブラリも追加します。
micro:bitのソースコード (Arduino)
ベースのプログラムは下記を参考にさせてもらいました。
動作はざっくり以下のようになっています。
- Custom service (testService)を設定
- Custom Characteristic (testReadWriteCharacteristic, testNotifyCharacteristic)を設定
- LED表示
- 接続前:ひし形(IconNames::Diamond)
- 接続中:笑顔(IconNames::Happy)
- 接続断:悲しい顔(IconNames::Sad)
- 接続中かつボタンAを押しているとき、Notify発行
#include <bleperipheral.h>
#include <microbit_screen.h>

BLEPeripheral blePeripheral = BLEPeripheral();

// create service
//uuidgen
BLEService testService = BLEService("19b10010-e8f2-537e-4f6c-d104768a1214");

char defaultVal[] = {' ', ' ', ' ', ' ', ' ', ' ', ' ', ' ', ' ', 0x00};

BLECharacteristic testReadWriteCharacteristic = BLECharacteristic("19b10011-e8f2-537e-4f6c-d104768a1214",
                                       BLERead | BLEWrite,
                                       11);
BLECharacteristic testNotifyCharacteristic = BLECharacteristic("19b10012-e8f2-537e-4f6c-d104768a1214",
                                       BLERead | BLENotify,
                                       20);
char* receivedBuf = "          ";

void setup() {
  Serial.begin(115200);
  SCREEN.begin();

  pinMode(PIN_BUTTON_A, INPUT_PULLUP);
  pinMode(PIN_BUTTON_B, INPUT_PULLUP);

  blePeripheral.setDeviceName("BBC micro:bit");
  blePeripheral.setLocalName("BBC micro:bit");

  blePeripheral.setAdvertisedServiceUuid(testService.uuid());
  testReadWriteCharacteristic.setValue(defaultVal);

  blePeripheral.addAttribute(testService);
  blePeripheral.addAttribute(testReadWriteCharacteristic);
  blePeripheral.addAttribute(testNotifyCharacteristic);

  blePeripheral.setConnectionInterval(0x0006, 0x0028);

  // BLE init
  blePeripheral.begin();
  Serial.println(F("BLE HOGE Peripheral"));
}


void loop() {
  SCREEN.showIcon(IconNames::Diamond);

  // Blocking wait...
  BLECentral central = blePeripheral.central();
  if (central) {
    // central connected to peripheral
    Serial.print(F("Connected to central: "));
    Serial.println(central.address());

    while (central.connected()) {
      SCREEN.showIcon(IconNames::Happy);
      if (digitalRead(PIN_BUTTON_A) == LOW) {
        unsigned char temp[20] = {};
        uint32_t time_us = micros();
        memcpy(temp, &time_us, 4);
        for(int i = 4; i < 20; i++) {
          temp[i] = i;
        }
        if(testNotifyCharacteristic.canNotify()){
          testNotifyCharacteristic.setValue(temp, 20);
          Serial.println(time_us, DEC);
        } else {
          Serial.println("wait");
        }
      }
    }
    Serial.print(F("Disconnected from central: "));
    Serial.println(central.address());
    SCREEN.showIcon(IconNames::Sad);
    delay(2000);
  }
}
Webブラウザの準備
chromeを起動し、下記をURLのところに入力する。
chrome://flags/#enable-experimental-web-platform-features以下の画像のように、「Experimental Web Platform features」を「Enabled」に変更する。

chromeを再起動する。
htmlファイルの作成
WebブラウザからBLE接続、Notifyデータの取得をするためのhtmlファイルを作成しました。普段はまったくコーディングすることのない不慣れなhtmlとjavascriptを色んなサイトを参考にさせてもらいながら書きました。
一応、動作するようになったものが下記です。(再接続処理は未完成)
<!DOCTYPE html>
<html>
<head>
<meta charset="utf-8" />
<title>BLE Test</title>
</head>

<body>
<form name="js">
  <div>
    <input type="button" value="接続" onclick="connect();"/>
    <input type="button" value="切断" onclick="disconnect();" />
  </div>
  <div>
    <p id="notify">Send</p>
    <p>
      <input type="text" name="y" value="" />
      <input type="button" value="送信" onclick="send();" />
    </p>
  </div>
  <div>
    <p id="notify">Notify</p>
    <p>
      <textarea cols="50" rows="10" id="notify_msg"></textarea>
    </p>
  </div>
</form>

<script>
var connect_try = true;

var ble_device;
var ble_server;
var gatt_service;
var send_characteristic;
var notify_characteristic;

//micro:bit BLE UUID
var TEST_SERVICE_UUID            = '19b10010-e8f2-537e-4f6c-d104768a1214';
var SEND_CHARACTERISTIC_UUID     = '19b10011-e8f2-537e-4f6c-d104768a1214';
var NOTIFY_CHARACTERISTIC_UUID   = '19b10012-e8f2-537e-4f6c-d104768a1214';

function connect() {
  navigator.bluetooth.requestDevice({
    filters: [{
      namePrefix: 'BBC micro:bit',
    }],
    optionalServices: [TEST_SERVICE_UUID]
  })
  .then(device => {
    ble_device = device;
    console.log("device", device);
    return device.gatt.connect();
  })
  .then(server =>{
    ble_server = server;
    console.log("server", ble_server)
    return ble_server.getPrimaryService(TEST_SERVICE_UUID);
  })
  .then(service => {
    gatt_service = service
    console.log("service", service)
    return gatt_service.getCharacteristic(NOTIFY_CHARACTERISTIC_UUID)
  })
  .then(chara => {
    console.log("Notify:", chara)
    notify_characteristic = chara;
    notify_characteristic.startNotifications();
    notify_characteristic.addEventListener('characteristicvaluechanged',onNotification);
    return gatt_service.getCharacteristic(SEND_CHARACTERISTIC_UUID)
  })
  .then(chara => {
    alert("BLE接続が完了しました。");
    console.log("Send:", chara)
    send_characteristic = chara;
    // 切断時に実行される関数
    ble_device.addEventListener('gattserverdisconnected', onDisconnected);
    connect_try = true;
    return;
  })
  .catch(error => {
    alert("BLE接続に失敗しました。");
    console.log(error);
  });
}

function onNotification(event) {
  let notify_element = document.getElementById('notify_msg');
  console.log(event.target.value);

  let timestamp = event.target.value.getUint32(0, littleEndian = true);
  notify_element.value = notify_element.value + timestamp + ":";

  for(let i = 4; i < event.target.value.byteLength; i++){
    let temp = event.target.value.getUint8(i);
    notify_element.value = notify_element.value + temp;
  }
  notify_element.value = notify_element.value + "\r\n";
}

function disconnect() {
  if (!ble_device || !ble_device.gatt.connected) return ;
  ble_device.gatt.disconnect();
  connect_try = false;
  alert("BLE接続を切断しました。")
}

function send() {
  temp = Uint8Array.from(document.js.y.value);
  console.log('y:' + temp);
  return (send_characteristic.writeValue(temp))
  .catch(error => {
    console.log('Error : ' + error);
    this.onError(error);
  });
}

function onDisconnected() {
  console.log('Disconnected');
  let timerId = setInterval(function() {
    if(connect_try){
      if(ble_device.gatt.connect()) {
        clearInterval(timerId);
        console.log('Connected');
      }
    } else {
      clearInterval(timerId);
    }
  }, 1000);
}
</script>
</body>
</html>
下記が動作時の画面です。
「接続」ボタンをクリックすると、BLEデバイスを検索します。

Notifyが届くと、1行ずつ表示されます。最初の10桁の数字(:まで)はmicro:bitで付加したタイムスタンプ(us単位)です。どの程度の通信速度が出せるか調べてみたかったので、タイムスタンプ4byte+16byteの合計20byteを送信しています。
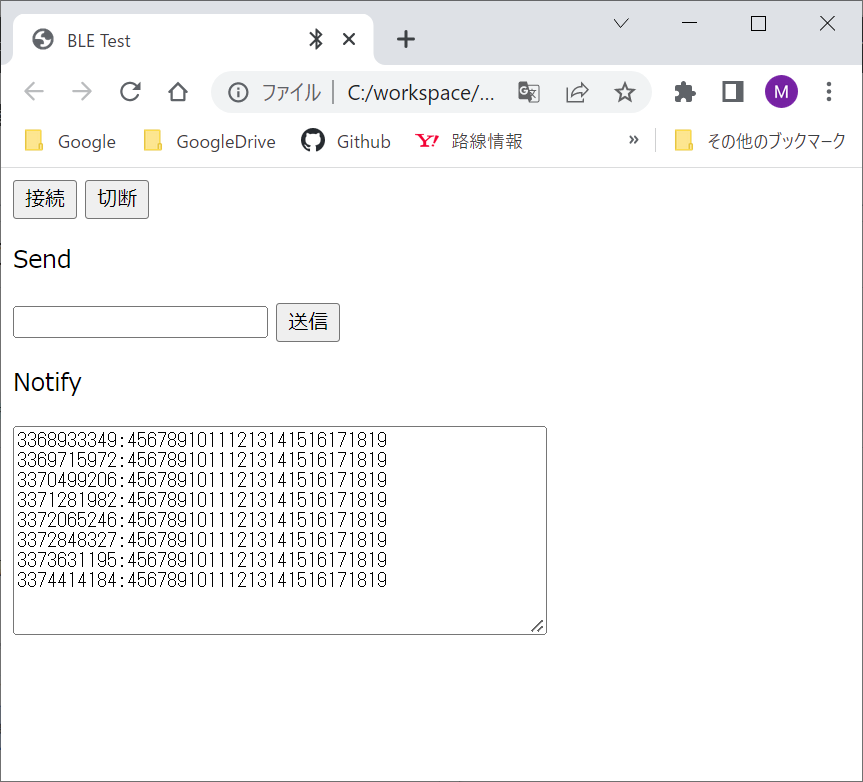
Notifyを連続送信させたところ、45msで20Byte×6回=120Byte送信できていたので、20kbpsくらい出ていた計算になります。ちょっとしたログを取るのに使えそうな感じ。